Thursday, May 10, 2012

Toddler Time Take 2


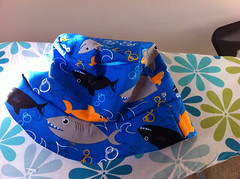
I made another bag using the new Anna Maria Horner fabrics! A new store, Sew Memphis, has opened up in town and they are carrying Amy Butler and Anna Maria Horner and other Free Spirit designers! I have also written out the instructions on how to make this bag, and am selling the Toddler Time Diaper Bag Pattern on etsy.


If you want to purchase the pattern, use the coupon code sfncmay2012 for 20% off the pattern price until May 30th!

Happy Sewing!

Tuesday, April 24, 2012

Quilt for Auction


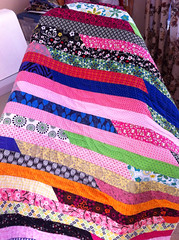
I have so many projects going on but can't post them just yet! I did just get this back from the long arm quilter,Quilts to a T! It is a quick easy 1600 quilt Teresa Pino from Quilts to a T and I are donating to the elementary school for the spring fling auction! The only issue with the 1600 pattern is it is really difficult to square the quilt!

Happy sewing!

Saturday, April 7, 2012

Baby things!

I am preparing for my sister in laws baby shower in a few weeks, so things are a bit crazy! I love planning parties and will post pictures, but I am a bit of a perfectionist and try to do everything either handmade or bought from an artisan. I ordered the invitations from Hootsie on etsy, who does beautiful things with paper! A friend is making fancy cookies for favors! Now I just have to find game prizes and games!

Along with planning, I have just finished the gift, a Hawaiian themed diaper bag! 


I am working on the little accessories to go in the bag. The pattern I have used before, it's the Go Mama! Diaper Bag Pattern I found on etsy. LOVE this pattern. 

I have also been sewing for a few friends here with new ones, and tried my hand at these easy peasy little onesie dresses!

All they are is an extra long skirt (I did 3-6 month onesie and used a 22 inch strip for the skirt) sewn around the onesie. I stretched the onesie as I sewed, then added the little appliqué from the scrap fabric!

Happy sewing!

Friday, March 30, 2012

Diaper Bag Giveaway!

I started a Facebook page to go along with the blog, since I am trying to push myself to write more tutorials for my projects and share more of my sewing in hopes of learning more tricks and techniques! You can find me on Facebook at Southern Fried Northern Chic.

To help things along, I decided to do a giveaway for the Facebook page! Here are the details. Like the Facebook page.  That is all you have to do. If I can reach 100 likes by Sunday, April 2, one name will be picked at random from the Facebook page to win this....


Ta-Da! It is 14 wide by 12 high by 6 deep. the front pocket is one open pocket, perfect for keys!


The back has a zippered pocket.


The side stretchy pockets fit a sippy cup or an iphone!


The inside is lined with a variety of pockets!! There is a snap closure you can't see in the pictures!

Thursday, March 29, 2012

Clothes for a little southern gentleman

One big difference I have noticed living down here is that parents take care in dressing their children (and themselves). A lot of what is typical southern would be considered too cutesy farther north, where moms would chose keens over mary janes, and headbands over hairbows. I have to admit, I love a lot of what is considered cutesy in children's clothes. I love smocking. I had never really seen it until we moved here, and I have dedicated HOURS of my life learning how to smock, and more productive hours shopping the consignment stores for smocked outfits! 

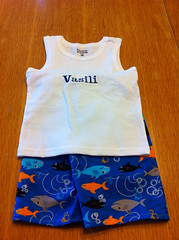
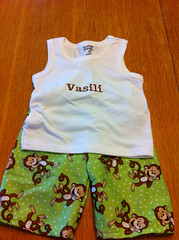
I have noticed some of  the other little southern gentlemen wearing outfits with their name embroidered on them, or a cute matching applique on the front. I started shopping around for them, and came to realize these adorable outfits start at about $35! Simple pants and a top! Sew.....


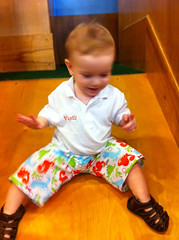
 I decided to make a few new outfits for Bubba. This one is my favorite, he wore it today! It was really hard getting the polo shirt in the embroidery hoop, but well worth it! The other outfits I chose tanks to go with, since it gets so hot here!


I even started to make bucket hats to match each one! Not that a toddler will keep a hat on his head!


. I found a free pant pattern online, along with the bucket hat pattern. All the fabric came from the scrap bin at Joann Fabrics. The shirts were from Walmart. It was hard to embroider  on the polo shirt, but I love how it came out! We went out today and I had a few moms ask where I found his outfit. I spent a grand total of about $15 and 3 hours of work for all three outfits!


I think I am going to make him a few john johns next!

Tuesday, March 27, 2012

Toddler Diaper Bag


Yeah!!! So this is my new diaper bag. I needed something bigger than a purse, but smaller than the massive diaper bag I had. I wanted sippy cup pockets on the side, and love the curved pockets on a lot of bags now, so this is what I came up with! It is my first design that is more complicated. I think I am going to try it out for a few days then maybe make the top band a little smaller.

I am so excited that this came out! a few weeks ago it was a sketch, then I calculated how big and came up with a rough pattern, then double checked the math on it, then yesterday I just jumped in! The back has a zippered pocket.

If I like it, I will add a tutorial in a few days!!! If not, back to the drawing board...

OK, so I looked at this bag and changed a few things up, this is the new version


The only difference is the band is only 2 inches instead of 4!

Monday, February 6, 2012

Daddy Diaper Bag Tutorial!

Sew... This is the Daddy Diaper Bag!


It's a big boat tote with lots of pockets, usually made out of sports fabrics. Hey, if it gets Dads to start carrying the 20 pounds of stuff needed for an outing with a baby, then it is worth it!

I usually buy 1 yard each of 3 fabrics. Lets say fabric 1 is the square gators, fabric 2 is the blue at the bottom (and lining) and fabric 3 is the orange. I buy extra to make accessories. ALL SEAMS ARE 1/4 inch!

Cut
Fabric 1
2 - 10 1/4 high by 21 wide
1 strip 10 1/2 for interior pockets

Fabric 2
2 - 21 wide by 18 high
2- 8 1/4 high by 21 wide

fabric 3
3 strips 4 1/2 inches
1 piece 12 high by 8 wide

Decor Bond fusible interfacing (or craft fuse)
1 inch wide strips for handles
2 - 10 1/4 high by 21 wide
2 - 21 wide by 18 high
2- 8 1/4 high by 21 wide

fuse interfacing to cut pieces. Prepare the handles by sewing the strips together. I do as if I was sewing binding.


After sewing the 3 strips together, take to ironing board and press in half, open, then press again.

place interfacing strip in one of the grooves, press again. Seam up both sides at about 1/8 inch. Then, to make 2 handles, fold in half and cut.


To make lining. Take your 10 1/2 inch strip, fold in half right sides together and seam. Pull right side out, press, and topstitch at the unseamed top. Cut in half, so you will have 2 pieces about 22 inches long each.

Mark a 2 1/2 inch square in the bottom corner. Cut out. Take a long ruler and with your marking tool mark a line 3/4 up from the corner cuts


Pin pocket along bottom line, stitch as close to bottom as you can. Then take your ruler and make pocket lines. I leave the pocket sizes up to you! Just make sure you stitch 1 or 2 stitches over the edge and tack it down really well.

When you are done, put the lining together. LEAVE AN OPENING AT THE BOTTOM TO TURN.  You can add a magnetic clasp if you want.

Fold your front pocket piece in half wrong sides together, and topstitch about 1/8 from top. Now it will be 6 tall by 8 wide. Take your top piece and fold in half, fold the pocket in half and match with the center of top piece, lining up the bottoms. Then take your handle and line up overtop the pocket,so the handle covers half of the pocket. Pin down. Make sure handle is not tangled!

take a ruler and mark the handles 2 inches from top. This will be your crosspoint.

Stitch up over top the handle stitch, cross over at the mark and sew back down the other seam. repeat for other side. reenforce the stitch at the top, since it will bear a lot of weight.

on the top backside, line up the handles to they are the same width apart as the other piece, and assemble in the same manner.

Then sew the bottom and top together. Press towards the bottom and topstitch at 1/8 inch.


Then cut the 2 1/2 inch squares out of the bottom sides. assemble outer bag. Pin bag outer and lining right sides together, turn and topstitch.


Hope this was helpful!